Remove the WordPress logo from the admin bar

Want to make your WordPress site more “white label” to users who are logged in?

Originally I was just going to remove the icon, but there is a whole wordpress menu under there. Let’s just remove the whole lot!

If you have a child theme in use, you can add the following code snippet to the functions.php file. Otherwise use a plugin like Code Snippets (not affiliated in anyway, it’s just a plugin I use), and create a new snippet. Make sure to “Save and Activate” the snippet.

add_action( 'admin_bar_menu', 'remove_wp_logo', 999 );

function remove_wp_logo( $wp_admin_bar ) {
$wp_admin_bar->remove_node( 'wp-logo' );
}

from the WordPress Codex: https://codex.wordpress.org/Function_Reference/remove_node

Incorrect wifi password in iOS

My kids are always playing in areas of the iPad or iPhone that they really shouldn’t be. Unfortunately Apple have never allowed us to have a truly restrictive setup for kids in this way.

Every now and then they muck up the wifi and have tried connecting to someone else’s wifi and then they can’t reconnect to our own as it prompts for a password (or it simply doesn’t connect). Entering the correct password greets us with the annoying “incorrect password” dialog.

You know it’s the right password, it hasn’t changed in years (that’s probably the first thing we’re doing wrong right there, but that’s a whole other bag of problems).

If you have tried entering in the password, and you’re confident the password is correct there are three things you can try, the last of which will almost always work, but I like to start with the softer options:

  1. Forget the wifi network and then try to reconnect. This one will generally work if it wasn’t prompting for a password to begin with and just not connecting.
  2. You could change the wifi password in your wifi router and try connecting to that. It IS a good idea to change it once in a while anyway. If the device then connects, you could then change it back and try connecting again.
  3. Go to:
    settings >> General >> Reset >> Reset network settings
    and clear the network settings. You’ll need to confirm this with your pin but you will lose no data. DO NOT do a factory reset, in that case YOU WILL lose data. Make sure you are only resetting the network settings and continue.  After the device restarts you should be able to login without any issues.

Good luck and I hope this has helped solve your issue

LS Colours in OSX

I don’t like the default black on white in OSX Terminal (in fact, I’ve just remembered, I don’t like OSX Terminal, I’ll make another post about that). And the only dark background that’s close to anything good is homebrew, but ls doesn’t have colour.

A quick search pulls up a stack post on Ask Different that details the appropriate exports:

export CLICOLOR=1
export LSCOLORS="ExGxBxDxCxEgEdxbxgxcxd"

I didn’t really like the bold directory and found another in the comments:

export LSCOLORS="gxBxhxDxfxhxhxhxhxcxcx"

yeah, but I didn’t really like that either. Then *further* in the comments I found a link to: https://geoff.greer.fm/lscolors/ where you can customise the colour scheme to your hearts content. :)

I fumbled around for a bit, but in the end I settled with: gxfxcxdxbxegedabagacad

Windows Update in Virtual Machines


virtualbox
I use virtual box to run a number of virtual machines. Tonight when trying to update a recent install of windows I found the update stalled and kept searching aimlessly doing nothing.

It turns out you need to enable “promiscuous mode (always allow)” on the network adaptor of the virtual device for the update to go through. Enabling a second network adaptor in that mode for the purpose of the update worked. Reverting to the previous setting once updates (and reboots) were complete.

I did make the mistake of turning the initial adaptor back on before doing a reboot and it was in a constant state of “rebooting” but sitting there looking stupid at me. Going back to the virtual machine manager and unplugging the network card allowed the reboot and completion of the update process to continue (obviously Microsoft are still accessing the internet at that stage and without internet direct access this step would not continue).

Here’s Where Google Hid Chrome’s SSL Certificate Information

Tonight I wanted to know where a particular site had their SSL certificate issued. Upon clicking the green padlock in Chrome, I found that there were no certificate details to be found anywhere. After a good minute or two of not being able to find it, I did what any other reasonable person would do.

I googled it.

Surprisingly, it’s been moved. Why? I don’t know. But it’s certainly not intuitive.

“Google Chrome users have been contacting me wondering why they no longer could access the detailed status of Chrome https: connections, or view the organization and other data associated with SSL certificates for those connections,” writes Slashdot reader Lauren Weinstein, adding “Google took a simple click in an intuitive place and replaced it with a bunch of clicks scattered around.”

Up to now for the stable version of Chrome, you simply clicked the little green padlock icon on an https: connection, clicked on the “Details” link that appeared, and a panel then opened that gave you that status, along with an obvious button to click for viewing the actual certificate data such as Organization, issuance and expiration dates, etc. Suddenly, that “Details” link no longer is present

The full certificate data is available from the “Developers tools” panel under the “Security” label. In fact, that’s where this info has been for quite some time, but since the now missing “Details” link took you directly to that panel, most users probably didn’t even realize that they were deep in the Developers tools section of the browser.
On some systems you can just press F12, but the alternate route is to click on the three vertical dots in the upper right, then select “More Tools”, and then “Developer Tools”. (And if you don’t then see “Security”, click on the ” >>”.)


reference: https://tech.slashdot.org/story/17/01/29/1820232/heres-where-google-hid-chromes-ssl-certificate-information

reference: https://lauren.vortex.com/2017/01/28/heres-where-google-hid-the-ssl-certificate-information-you-may-need

changing hostname in ubuntu

I cloned a virtual server and late realised they had the same hostname.

No problem.

  1. change the hostname in /etc/hostname:
sudo nano /etc/hostname
  1. change the hostname in /etc/hosts:

this file will contain localhost and your old hostname. eg,

127.0.0.1 localhost
127.0.1.1 <new-host-name>

edit this file to suit.

Finally, change the hostname in the current session:

This can be done one of two ways. Restart the system, or issue the following command:

sudo hostname <new-host-name>

tar tips

You’d think I’d just learn how to use this, but I suppose I use it so infrequently that I just can’t remember it. So here are my quick “go-to” tar references.

uncompressing

tar -xzvf filename.tar.gz

x:- eXtract
z:- parse through gzip
v:- verbose (show files)
f:- file archive

archiving/compressing

tar -cf archive.tar file1 file2 dir1
tar -czf archive.tar.gz file1 file2 dir1

notes to above:

  • you don’t HAVE to run the archive through gzip, although there’s no real reason not to. If you chose just to archive without compression, it merely means your file will be larger. This may or may not be a big deal
  • you [b]must[/b] specify a file archive (-f option), not specifying a file is an unrecoverable error and tar will exit
  • recursion is on by default, so if a directory name is specified, recursion will occur. To override that option specify (–no-recursion). Alternatively, if recursion is turned off within the environment it can be re-instated by stating (–recurse).

show me the contents

What if you just want to look at what’s in the archive?

Do a test (-t / –list) run.

tar -tvf archive.tar

This will output (list) the files to stdout without extracting the contents. Useful to see what’s in the archive.

Other useful options:

Here are just a few other useful options and command line usage options to tar that I find useful.

C:- Change to directory and extract at that location
–strip-components=1 :- use this if you need to remove the baseline directory from the archive

symbolic links in linux and Ubuntu

I always seem to have a tough time getting symbolic links right and often finding myself either Googling them or running test link after test link until I nail it. Normally I follow the mantra:

command {something} {somewhere}

such as:

mount /dev/sda1 /media/mydrive

/dev/sds1 being the “something” and the /media/mydrive being the somewhere

But with symbolic links, what is the something? Is it the symbolic link? is it the target? The somewhere, is that the target or is that the symbolic link? And the man page offers no help (at least not in my interpretation of it).

I’ve realised tonight the first error I’ve been making is forgetting you should explicitly set a full path to the target object (folder or file).

I’m often creating symbolic links to directories, usually remote and so a symbolic link in my home directory fits the bill.

What’s the correct syntax?

ln -s {/path/to/folder} {linkname}

ln -s /media/usbkey ~/usbkey

ln -s /run/user/1000/gvfs/afp-volume:host=DSBOX.local,user=dav3,volume=desktop/remotedir remotedir


iproutes

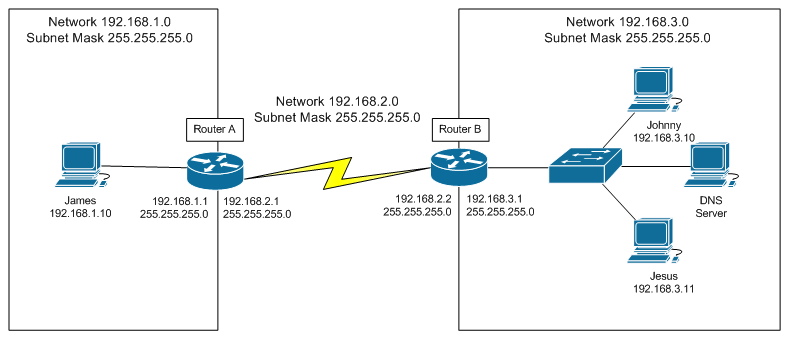
With regard to static routing, consider the above diagram. We have three separate networks: 192.168.1.0, 192.168.2.0, and 192.168.3.0. At first, network hosts (routers, computers, etc.) can only communicate with other hosts that are on their own network. For instance, the computer named James has a single interface on network 192.168.1.0, so that’s the only network that it can ‘see’. Initially, it will only be able to communicate with Router A.

Router A has network interfaces on the 192.168.1.0 and 192.168.2.0 networks, so those are the two networks that it can ‘see’. These are the only networks Router A ‘knows’ about, so it can only communicate with hosts on the 192.168.1.0 and 192.168.2.0 networks. So Router A doesn’t even ‘know’ that the 192.168.3.0 network exists.

Similarly, Router B can ‘see’ networks 192.168.2.0 and 192.168.3.0. When you enter a route into the table, you’re telling a host that there’s a new network it can get to, and you’re giving it the address of a gateway that it can use to get to the new network.

So to be able to contact Jesus (or any other host on the 192.168.3.0 network) from Router A, you’d enter the command:

ip route 192.168.3.0 255.255.255.0 192.168.2.2
             ^             ^             ^
           network        mask         gateway

This works because Router B can ‘see’ both Router A and Jesus. Thanks to this routing table entry when Router A wants to reach the 192.168.3.0 network, it knows it can get there via Router B at 192.168.2.2, so it sends the packet to Router B. Router B can see the 192.168.3.0 network directly, so it forwards the packet along to Jesus at 192.168.3.11.

So, now we know how to direct router A to the 192.168.3.0 network. But what if we want James to also be able to reach the 192.168.3.0 network? Well, Router A already knows how to get there, and James can already ‘see’ Router A, since they’re both on network 192.168.1.0. So we can just tell James to use Router A as its gateway to the 192.168.3.0 network. If James were a router instead of a computer, we’d use the command:

ip route 192.168.3.0 255.255.255.0 192.168.1.1
             ^             ^             ^
           network        mask         gateway

James would then be able to contact Jesus (or any host on the 192.168.3.0) network by forwarding the packet to 192.168.1.1 (Router A), which would then forward the packet to 192.168.2.2 (Router B) which would then forward the packet to its destination (Jesus in this case) via its directly connected interface.

Now, for Jesus to be able to respond to James, Jesus would need to have Router B set up as its gateway to the 192.168.1.0 network, and Router B would have to have Router A set up as its gateway to the 192.168.1.0 network. Then, any host on the 192.168.1.0 network would have a path to the 192.168.3.0 network and vice versa.

(reference: https://serverfault.com/questions/171551/help-me-understand-the-ip-route-command-for-cisco-routers )